Technical SEO can make or break your website ranking in SERPs, as it is one of the most fundamental aspects of SEO. If your site has technical SEO-related issues, you will definitely struggle to rank even with the best ever content.
In fact, without optimizing the website for technical SEO, you are holding back your site from getting organic traffic. Thus, it’s essential to spend time optimizing the technical SEO of your website.
Therefore, I’ve come up with this ultimate technical SEO checklist guide. You can simply implement them to improve your site’s performance and ranking in organic search results.
Technical SEO Checklist for Instant Traffic Boost
Before jumping into the technical SEO tips, let’s get some basic ideas.
Technical SEO is the process of website optimization, which helps to develop a strong website foundation and ensures easy crawling and indexing. It influences the ranking of your site, which results in improved conversion rates, lead generation, and sales.
In addition, it leads to maximizing the ROI from SEO as a digital marketing strategy. So, if you invest your time, effort, or money into optimizing technical SEO, you will definitely get the most value from it.
You can do it by yourself or hire an SEO company. I feel hiring an SEO agency will be the best decision as they can plan the strategies and handle the tactics much better.
Now, let’s find out the technical SEO checklists to boost your site’s search ranking and traffic.
1. Create a Google Search Console Account
If you haven’t created an account in Google Search Console yet, you should do it now. It’s absolutely free, and you don’t have to pay a single penny for this.
Well, the reason behind creating an account is that you can see the overall condition or performance of your site through this tool.
Moreover, it will show you the errors that Google crawlers and Googlebot encounter while visiting your site. For example, sometimes Google can’t crawl the entire elements of your web pages. And when Google can’t access your page entirely, you actually can’t think about the ranking.
Here, this free tool can help you out, as you can find out how Google views your page and all the issues. So, after creating an account, simply enter your page link at the top search bar of the Google Search Console. After that, you can see your page from Google’s point of view.
Very helpful, right? Yes, it is. This can also help you submit pages to Google, monitor rankings, fix crawling issues, and many more.
2. Create a robots.txt File
A robot.txt file is a series of commands or an instruction manual for web crawlers. It commands search engines which pages or sections of your website to crawl and display on relevant search results. In addition, this file instructs search engines where they can go and where they can’t.
According to Google Search Central, “primarily a robots.txt file is used to manage crawler traffic to your site, and usually to keep a file off Google depending on its type.” In this case, you can use robots.txt to block Googlebot from crawling a specific page that you don’t need to index by Google.
Finding your robots.txt file is super easy. Simply type your site name and use robot.txt at the end, like “example.com/robots.txt.” The file will look like the following image.
Usually, your robots.txt file consists of 4 components, and these are-
- User-Agent: This is the web crawler who can crawl your web pages. Remember, every search engine has a different name for its user agent. For example, Google’s user agent’s name is Googlebot.
- Disallow: It’s the directive that instructs the user-agent not to crawl a specific URL of your website.
- Allow: This directive instructs search engines to crawl a certain page.
- Sitemap: It is used to specify the XML sitemap location to search engines.
So, let’s see how to create a robots.txt file for your site.
- The easiest way is using a robots.txt generator tool like SEOptimer to avoid making any syntax errors. Remember, a single syntax error can deindex your site, therefore, ensure setting up robots.txt accurately.
- Once the file is ready, upload the robots.txt file to your website’s root directory.
- Use an FTP client such as FileZilla for placing the text file into the domain’s root directory.
- Now it’s time to test your robots.txt to see if it is working correctly or not. To do this, use robots.txt Tester, logging into the Google Search Console.
Now that you know the basics of robots.txt, let’s see the best practices getting the most value of it.
- As it is case-sensitive, ensure the file name is exactly like this “robots.txt,” not like “robots.TXT, ROBOTS.TXT, Robots.Txt,” etc.
- You should place the robots.txt file in the main directory, not in the subdirectory of your site. If you misplace it, you won’t find it again.
- You can use two wildcards in the robots.txt file, and these are
- (*): Address all User-Agents.
- ($): Indicates the end of a URL.

- Create a separate robots.txt file for every subdomain.
3. Create and Optimize Your XML Sitemap
To crawl and index webpages, sitemaps are necessary for Google crawlers. It informs Google about all the existing pages of your website. Without the XML sitemap, Google will find it difficult to navigate your site’s all pages.
Creating an XML sitemap is a matter of a few minutes if you are using a WordPress site with the Yoast SEO plugin. If you don’t have a WordPress site, simply use XML site generators like Screaming Frog to create your sitemap.
Get this thing very well; WordPress won’t automatically generate a sitemap for your website. You will require installing a plugin like Yoast or Google XML Sitemaps to do this for you. So, let’s get started with the process of creating an XML sitemap using WordPress for your website.
Using Google XML Sitemaps Plugin:
This plugin generates a complete XML sitemap for your website that you can submit to search engines. Here’s what you need to know about using the Google XML sitemaps plugin.
- At first, login to your WordPress dashboard, go to Plugins, and then Add New.
- Search for “Google XML Sitemaps.”
- Once found, click on the “Install Now” button, and after installing, hit “Activate.”
- After the activation process is done, this plugin will automatically generate a sitemap for you.
- To view the sitemap, type “yourwebsite.com/sitemap.xml” into the search bar.
- For changing the plugin settings, go to Settings → XML Sitemap → Basic Option.
- A best practice of SEO is to exclude archives and tag pages from the XML sitemap file. To do so, scroll down to “Sitemap Content” and uncheck both the boxes.

You can make other changes as per your requirement. Once you are done with the changes, click on the “Update” button and save the changes.
Using Yoast SEO Plugin:
You may be using the Yoast plugin for optimizing your page titles, meta description, and other stuff. For some reason, if you are not using this plugin, simply install and activate it. Once activated, you should-
- Go to SEO → General → Features and turn the “XML Sitemaps” toggle on.
- Then it will start generating the sitemap of your website.
Lastly, view your sitemap as mentioned before and, if needed, make changes from the settings.
Creating your sitemap using Screaming Frog:
The best part is, you can use Screaming Frog absolutely free for 500 pages. If your site has less than 500 pages, you can download the free version of this tool. So, let’s see how to make the best use of this tool for generating an XML sitemap.
- Once installing Screaming Frog, go to Mode and then Spider.
- Enter your domain name into the search box and click “Start.”
- It will take a few minutes to crawl your website.
- After finishing, navigate to Sitemaps and then XML Sitemap.
- If needed, tweak the settings and hit “next,” and save the sitemap to your computer.
Now, your sitemap is ready for submission to Google.
Submitting The XML Sitemap to Google:
Well, in the very first point, I have mentioned that you should create an account on Google Search Console. If you haven’t done it yet, follow the processes.
- Go to Google Search Console, and sign in using the email that is associated with your domain.

- Now, you will see a box like the above image. You can enter your domain into the domain box or enter the URL Prefix into the URL Prefix box to verify the ownership.
- Once logging into the dashboard, go to Sitemap → Add a Sitemap, enter the sitemap URL, and click Submit.
That is all, now your sitemap has been submitted to Google. With that in mind; remember one thing that Google won’t immediately start crawling your site; it will take a few days or weeks. But, remember, if you block any pages in robots.txt, it won’t be worth being in the XML sitemap.
Always prioritize all your high-quality pages in your sitemap. Also, it’s essential to maintain your sitemap occasionally and update the pages. If your site consists of 50,000 URLs, you can go for Dynamic XML Sitemaps.
4. Boost Your Website’s Loading Speed
Currently, Google is highly focusing on UX and started considering page experience as a ranking factor. To ensure page experience, improving the page loading speed is one of the significant factors. Therefore, you should focus on minimizing the loading time of your page by optimizing page speed.
The reason behind this is, a faster loading time allows less waiting time and quicker interaction with your page for users. In this way, your readers will feel more likely to stay on your page.
According to WebFX, 50% of readers abandon a page that takes more than 3 seconds to load. Therefore, you can’t afford to ignore this particular technical SEO aspect.
Now, to check the speed of your site, you can use any of these tools-
These tools will analyze your site’s speed, identify all the loopholes, and finally provide you the recommendation list for improving those errors. Here are the steps that you should consider to speed up your website.
Compressing Images:
By optimizing images, you can easily enhance the performance of your website. You should focus on scaling, sizing, formatting, and src attributing the images for optimizing. To compress images, see the following points.
Scale: You can use a tool like Smart Resize, Image Resizer Tool, etc., to crop the images to the correct size. For example, if your page is 600 pixels wide, you should resize your image to that width.
Size: The bigger your image size, the more it will take time to load. So, keep the size of the image as small as possible. If you are using WordPress, you can use WPSmush to reduce the image size. Other than that, the best option is to use TinyPNG or kraken.io.
Format: After compressing the size, now it’s time to format the image. For graphics with less than 16 colors, PNGs work better, while JPEGs are good for photographs. You can use CSS sprites for creating a template for frequently used images of your site. Try to avoid using BMPs or TIFFs.
Minifying CSS, HTML, and JavaScript:
By enabling compression, you can significantly reduce the size of your CSS, HTML, and JavaScript. You can use file compression software like GZIP, CSSNano, UglifyJS, and HTMLMinifier. These tools can minify your CSS, HTML, and JavaScript files by 50 — 70%.
In addition, while using codes, you can remove unnecessary spaces, commas, comments, formatting, and other characters. You can also use Minify to remove comments and whitespace and optimize your site’s CSS and JavaScript.
Using Browser Caching:
One of the biggest factors that contribute to your page speed is the size of your website. When a web browser displays your site’s page, it needs some time to download the codes or elements like logo, CSS files, JavaScript files, stylesheets, etc.
It implies when users visit your page for the first time, they have to wait until all the components are loaded to show the content. In this case, if you enable the browser caching, it will store some data on the visitor’s computer. As a result, your users don’t have to wait for the page to load while visiting your site further.
To enable browser caching, you should add some code to the “.htaccess” file on your server. Use the following code at the top of your .htaccess file, and the browser cache will be enabled.
Getting a Content Distribution Network (CDN):
CDNs mean content distribution networks, which are networks of servers. The CDNs are used for distributing the load of delivering content. The copies of your website are stored at multiple geographically diverse data centers. It helps the users to have reliable and faster access to your website. You can use CDN like BunnyCDN or Cloudflare to increase your site speed.
Reduce Redirects:
Redirects work great when you need one page to go elsewhere. However, it’s not a great option for your web page speed as they increase the number of HTTP requests and increase the page’s loading time.
Additional HTTP redirects add one or two extra network roundtrips, which incur hundreds of milliseconds of extra latency on 4G networks. That’s why Google recommends minimizing the number of redirects or eliminating them entirely. Finally, you can check your website’s redirects using the redirect mapper tool.
Delete Unnecessary Plugins:
Site owners who use WordPress have maximum chances of using several plugins. However, you may also find that some of them are not required. So, review the plugins and delete those you are not using. Activating too many plugins impacts the site performance, makes it slow, and causes security issues.
You should deactivate the plugins selectively. And after deactivating, you should measure your server performance on a tool like GTMetrix. In this way, you can identify the plugins that are affecting your website’s speed.
Reduce Server Response Time:
With the growing traffic, your website will start using more server resources, which results in slowing down and sluggish your website.
Google recommends keeping the response time under 200ms. You can effectively reduce your server response time if you follow all the tips of this boosting loading page section.
In most cases, you may need the help of SEO agencies to implement these best practices. So, if you don’t have an in-house developer, you can outsource page speed optimization services.
5. Optimize Your Website for Mobile Devices
Every business should develop a mobile-friendly website. In this fast-forward day, having a mobile-friendly website becomes necessary. Google also considers mobile-friendliness as a ranking factor. So, how do you know if your site is mobile-friendly or not? Well, by using one of these following tools, you can find out how much mobile-friendly your website is-
- Google’s Mobile-Friendly Test
- HubSpot’s Website Grader
- Bing’s Mobile Friendliness Test Tool
- GTMetrix
See the following image. Here, Google’s Mobile-Friendly Test tool shows that this site meets Google’s requirements and is mobile-friendly.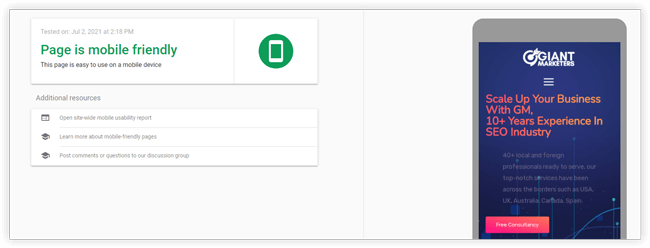
On the other side, HubSpot and GTMetrix provide recommendations about what to do to improve your site’s mobile-friendliness. So, here’s how you can optimize your site for mobile users.
Integrate Responsive Web Design:
Responsive web design is an approach to modern web design that allows websites and pages to display on all sizes of devices by automatically adapting to the screen. You can ensure responsive web design having the following features.
- Build your site with a flexible grid foundation.
- Incorporate flexible and compressed images.
- Must enable several views for different contexts.
Avoid Using Pop-Ups and Flash:
For drawing readers’ attention, sometimes pop-ups like sign-up or download free content work effectively. But if the pop-ups cover the entire or more than half screen and readers won’t find a way to escape from it, this can make them irritated.
So, while using pop-ups, be careful and use them sparingly or on parts of your page where they make sense. Or if you can avoid using them for mobile devices. Flash is very primitive, so you should replace it with HTML.
Create a Separate Mobile URL:
While optimizing for the mobile version, you should create a separate mobile URL. This thing will create a parallel site for the mobile user, which will improve the user experience. A typical mobile URL looks like “m.yourdomain.com” or “yourdomain.com/mobile.” So, when the readers enter your content through a mobile URL, they can see the mobile version of your page.
6. Schema Markup
When it comes to technical SEO, schema markup or structured data is another worthy investment of your time. Google uses structured data labels and data snippets that appear in the HTML code of your page. This Schema markup helps search engines to understand the information about your website to provide rich results.
There is schema markup for content, blogs, local businesses, restaurants, recipes, events, products, and many other applications. It does not impact your ratings but definitely gains more chances of earning CTR. Implementing schema can be a tricky task. Therefore, it is recommended to use schema generator tools. Such as,
- Hall Analysis schema markup generator
- Google Structured Data Markup Helper
- Microdata Generator.com
- Merkle Schema Markup Generator
If you are using WordPress with the Yoast plugin, then it will add structured data for your page.
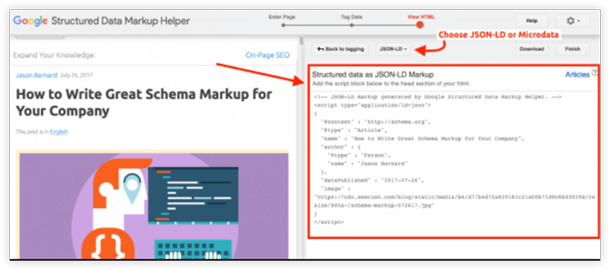
Generating Schema Markup Using Google Structured Data Markup Helper
Among all these tools, the most popular tool is Google structured data markup helper, which you can use to generate schema markup. So, let’s see how to use this tool. Get started by following these steps to use structured data on your website.
- Select a type of schema, then paste it into the URL of the page that you want to implement that schema on.
- Click elements on the page and select attributes to create the tags.
- Once done, click on “Create HTML,” and the tool will generate HTML structured data based on your selection. Make sure to choose JSON-LD or Microdata.
- Once generating a schema, you should test it to see if you are doing things right or wrong. So check your work using Google’s Structured Data Testing Tool.
- If everything looks good, you can implement the schema markup on your site through your CMS or directly into source code.
For the best result, make all the structured data visible to the user. You should avoid using any access control methods, for example, no index on pages with structured data. Instead, apply structured data to all your appropriate content, like “how-to.”
7. Fix Site Errors and Warnings With Weekly Site Audits
You should run a weekly technical SEO audit to fix all the site errors and warnings. It is necessary for ensuring top ranking on the SERP on a consistent basis. But, how to perform a technical audit?
Well, you will find several SEO audit tools which can help you in this task. Here I’m going to mention some of them-
As SEO is an ongoing process and things keep changing frequently, you can’t ignore auditing your site. Through this index audit, you can run an in-depth analysis of your website and discover all the errors. I’ll discuss the technical SEO errors and fixing process throughout this guide that you can find from the SEO audit.
8. Add and Optimize Internal Links
Internal links are hyperlinks from one page that point to other pages on the same domain. In short, internal links connect pages on the same domain. Without internal linking, it becomes difficult for Google to index your site pages. Also, a poor internal link structure can impact the search visibility of your website.
See the following reasons to understand why internal linking is necessary.
- It improves easy navigation to other pages of your website.
- Helps to establish a hierarchy of information on your site.
- Spreads link juice or ranking power around your website.
- Encourage users to spend more time that helps in decreasing bounce rates.
- Increase page view of your site.
Now that you understand the importance of internal linking, let’s explore the best practices.
Use Descriptive Keyword-Rich Anchor Text:
Anchor text is the portion of a link of your page that is visible to your visitors. In other words, it is the highlighted text of your content that readers click to visit other related pages. Thus, it should be descriptive enough to provide visitors a clear idea about that page’s information. For example-
Use Dofollow and Natural Links:
As I mentioned earlier, the robots.txt file restricts search spiders from accessing some of your web pages. Therefore, you should make sure that the links you are using are dofollow. Also, you should ensure natural internal linking for the readers. Because when users see related informative links of the context, they will feel more likely to click that link.
Link Deep Within Your Site Structure:
You should look out for link opportunities deep within your website structure. It’s essential to link the top-level internal pages to boost your website’s overall SEO value. So, instead of linking only the home page and contact page, start including links to other related pages also.
9. Use Canonical URLs to Avoid Duplicate Content Issues
You should prioritize deleting duplicate content from your site. To find duplicate content, you can use an SEO tool like Semrush. But, there are some cases when you can’t do anything with the duplicate content. In that case, canonical URLs work best for you. It can resolve unintentional duplicate content issues.
If you are running an e-commerce website with hundreds of identical pages, canonical URLs become much useful. You can specify canonical URLs in five well-known ways, which are known as canonical signals. Now, here’s how to avoid content duplication and Google penalty by using canonical.
HTML Tag (rel=canonical)
To specify a canonical URL, the simplest and most obvious way is using a rel=canonical tag. Let’s assume you have an e-commerce website that sells t-shirts, and you want https://yourdomain.com/tshirts/gray-tshirts/ to be the canonical URL. So, simply add the canonical tag to any duplicate pages of your site, like this-
<link rel=“canonical” href=“https://yourdomain.com/tshirts/gray-tshirts/” />
The great thing is, if you are using a CMS without messing around with the codes, you can do it in a simple way. Just install the Yoast SEO plugin, and it will automatically add the canonical tag. Then, go to the “Advanced” section on Yoast, find the canonical URL, and enter the original content’s URL.
HTTP Header:
At first, open up your .htaccess file to add the canonical tag for a specific page, like to create the canonical tag like “seo-guide.pdf.” Then add in the “Header add Link” command.
Lastly, submit the URL to Google Search Console Fetch & Render to get the canonical crawled.
Sitemap:
Google recommended listing only the canonical URLs into the sitemap. The reason behind this is, Google can see the pages listed in the sitemap as suggested canonical. So, pick a canonical URL for every page of your site and submit them in the sitemap. Now, based on the comment similarity, Googlebot will decide which pages are duplicates.
301 Redirect*
When it comes to diverting traffic away from a duplicate URL, you can use 301 redirects. Let’s say, your users can reach your page through all these URLs-
- yourdomain.com
- yourdomain.com/index.php
- yourdomain.com/home/
So, you should select any one of the URLs as canonical and redirect the other URLs there. Ensure to do the same thing for securing HTTPS/HTTP and the www/non-www version of your site.
Internal Links:
This phase implies the process of linking one page from another throughout your site. This linking process is known as the canonicalization signal.
The more you can be consistent with the canonical URLs; the more Google will follow your lead and use those too.
10. Establish an SEO-Friendly Navigation
Whether you own a small or large website, it is essential to establish an SEO-friendly navigation menu. The main navigation menu of a site usually appears at the top or left-hand side. However, some website uses additional menus to make it easier for the users to find the additional content.
For technical SEO, you should focus on the following best practices for the navigation menu.
- Keep your main navigation the same across all pages of your site.
- Organize the menu items within the sub-menus.
- Try to keep the main navigation to 7 or fewer core menu items.
- Be clear and avoid using phrases like “let’s chat” or “get in touch.”
- Use Google Analytics while making any updates and monitor the behavior.
Ensure making the menu worth navigating, as it plays a crucial role in providing an amazing user experience.
11. Use an SEO-Friendly URL Structure
Often, technical SEO focuses on the usability or discoverability of your website. Therefore, technical SEO includes optimizing your site’s URL structure.
But, what is an SEO-friendly URL structure? Let me show you with an example,
http://www.yourdomain.com/content.php?pid=169783546&sid=10175967/2009/04/15
http://www.yourdomain.com/blog/social-media/how-to-promote-your-tweets/
As a reader, which URL will you prefer to click through? I think the second one, right? The reason is, the first URL’s content is not clear, and users will find it difficult to guess the content topic. On the other side, the second example implies the content clearly, and what readers can expect from the content.
So, when it comes to making URLs, ensure to keep the human readers in your mind. Here are the factors that you can follow to create your URLs most SEO-friendly.
Keywords:
You should optimize your header, meta description, and title tags with target keywords to indicate what the reader will get on the page. The page’s URL should also do the same. Using the same terms as your title or header in the URL is a good rule of thumb. So, always include the target keyword in the URLs
Length:
Short URLs are easier to index than longer ones. Shorter URLs make it much easier for the readers to remember and find the page whenever needed and share it with others. Try to keep the URLs in between 5 words. If you have to go more, then instead of chopping the entire phrase, you can eliminate the extra words like “the,” “and,” etc.
Word Separators:
https://giantmarketers.com/seo-service-provider-company-in-bangladesh/#
https://giantmarketers.com/seoserviceprovidercompanyinbangladesh/#
Notice the above examples; what do you think, which one is easier to understand? The first one, right? Yes, because it uses separators like dash to separate each word. This makes the URLs more readable and less likely to be misread by both the search engines and readers.
Characters and Character case:
Some site owners like to use uppercase letters to separate words. But the issue is some servers are case-sensitive, and they index the URL as it is. So they won’t match the URL if the searchers type with lower letters. That’s why it’s best to write the URL in lowercase letters.
12. Install an SSL Certificate and Start Using HTTPS
SSL certificates, aka HTTPS, have been considered as a ranking factor since 2014 by Google. So, no excuse will be allowed for not using HTTPS encryption on your site. It’s a big technical SEO issue. And if you are still running your site on HTTP, you should migrate it immediately. Here are some other reasons to have HTTPS.
- It improves the security of your website by creating a secure connection.
- Audiences prefer the HTTPS padlock while shopping online.
- All the user’s given information is encrypted with HTTPS.
- Boosts customer’s trust and ranking in the SERPs.
To get an “https” in front of your website’s domain name, you should encrypt all the communication between your site and the visitors. The primary protocol to do this is getting an SSL certificate. But before that, you have to make sure that your site has its own IP address. There are several SSL certificate providers like-
Once purchasing, you need to activate and install it on your server. And in this phase, you can contact your hosting provider or a developer to do this for you. A quick way to check this is to check whynopadlock. This free tool helps to determine if your site has an SSL certificate and if it is installed correctly or not.
If your hosting doesn’t provide an SSL certificate, you’ll need toset up the appropriate redirects from your HTTP to HTTPS pages. For this step, get the help of an SEO agency. By following the SEO best practices, they can create the necessary redirects.
13. Find and Fix Broken Links on Your Site
Broken links are bad for SEO and the user experience of your website as well. You don’t want your user to land on a “404 Not Found” page. This thing creates a bad impression and leads the user to never returning to your page again. That is why you should look out for the broken links of your site frequently.
Fortunately, there is an easy fix for this issue. If your site is running on WordPress, simply install the Broken Link Checker plugin. Also, you can use this free tool called DrLinkCheck.com.
This plugin and tool will scan the entire site and allow you to fix them promptly. Here’s how to fix the broken links.
Fixing Internal Links:
With two possible ways, you can fix the internal links. The first one is replacing the broken links with live links. The second one is, with a ton of broken links, you can simply remove them.
Fixing Backlinks:
It’s true that you have no control over the external links or backlinks. But you can at least reach out to the linking website and request a fix. Also, look out if you made a mistake by changing the URL of a page and forgot to redirect. You can also find out the context of the broken page and replace or recreate it. Lastly, find similar content on your site and redirect the broken page to that page.
Last Thoughts
Often, technical SEO takes a backseat in front of on-page and link-building aspects. Though, technical SEO is equally important, so never underestimate it. It’s a vast topic that requires you to stay updated constantly.
This is where SEO agencies come into play. So, if you are looking to improve your website foundation through technical SEO, Giant Marketers is there for you. Simply Contact Us for details and then our technical SEO expert will handle the rest.
Also, you can share your thoughts about this guide by commenting below.

Masum Billah Bhuiyan, the founder of Giant Marketers, is a name synonymous with digital marketing innovation and entrepreneurial success. Born and raised in Bangladesh, Masum was always passionate about technology and business. As a young man, he had a strong desire to make a difference in the world and was drawn to the rapidly growing field of digital marketing.